It’s the most heartbreaking sound a Neato owner can hear. The robot pulls off the dock, spins up its turret, whirs for ten seconds, and then stops dead. The screen flashes the dreaded message:
“My Vision was blocked. Please press OKAY (3000)”
Sometimes you see “Please clear my path (3000),” or you might just find your Neato robot vacuum spinning in circles before giving up and crying for help.
If you contact official support (what's left of it), they will tell you the Lidar unit is dead and you need a new robot. They are lying. Your robot isn't dead; it just has a slipped disc or a weak heart.
This guide covers the definitive Neato Error 3000 fix for the price of a sandwich.
Table of contents
The Diagnosis: Is it the Belt or the Motor?
The Neato XV sees the world through a spinning laser turret (Lidar). The physics are simple: If that turret doesn't spin at exactly ~300 RPM (Revolutions Per Minute), the laser cannot draw a map, triggering the Neato XV vision blocked error.
Level 1: The “Q-Tip Test” (Physical Check)
Before you order parts, grab a Q-tip.
- With the robot OFF, gently poke the Q-tip into the side of the turret (under the round plastic cover).
- Try to spin the laser unit manually.
- Does it spin freely with ZERO resistance? Your belt is likely broken or slipped.
- Does it feel “gritty,” stiff, or hard to turn? Your motor bearing is seized.
- Does it feel smooth, but the robot just won't spin it up? Your motor brushes are burnt out.
Level 2: The USB Test (Software Check)
If you want to be 100% sure, plug your Neato into your PC using a Mini-USB cable.
- Download NeatoControl (or Neato Toolio) (see Neato XV software repository).
- Connect to the robot's COM port.
- Click the “Scanner” or “Lidar” tab.
- If you see a scatter of red dots appearing on the screen, your laser is working!
- If the text log says
RPM: 0even when the motor tries to spin, your motor is dead.
You may check this guide on how to use NeatoControl to scan your Neato XV.


Fix #1: Neato Lidar O-Ring Replacement (The $2 Solution)
The Lidar is driven by a simple rubber O-ring. Over 10+ years, this rubber dries out, stretches, and slips. The motor spins, but the turret lags behind.
What you need:
- A replacement Lidar O-Ring Belt. (Search for “Neato XV Lidar Belt” or “Silicon O-Ring Red”).
- Hacker Note: If you can't find the official part, the correct Neato XV laser belt size is roughly an 85mm ID x 2mm thickness plumbing O-ring, though silicone belts from eBay/Amazon may last longer.
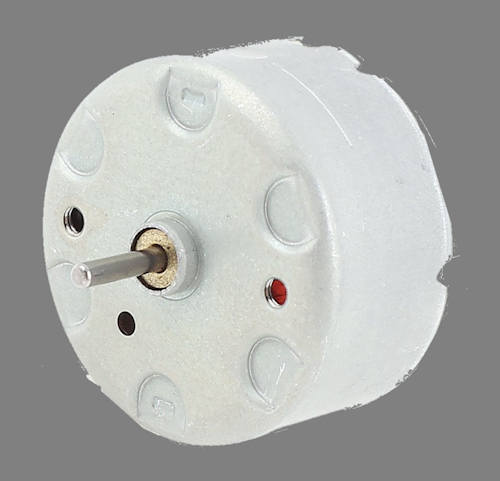
Fix #2: Neato XV Lidar Motor Replacement (The $8 Solution)
If a new belt doesn't work, the small DC motor driving the turret is toast. This is a standard Mabuchi RF-500TB-12560 motor, commonly used in CD players.
⚠️ THE “GOTCHA” (Read This Before Buying)
This is where most DIYers fail. Standard Mabuchi motors spin Clockwise. The Neato XV Lidar requires Counter-Clockwise rotation. If you buy a generic motor and plug it in, the robot will just twitch and fail because the Lidar is spinning backward.
The Fix: You must perform a Mabuchi RF-500TB-12560 reverse polarity modification. When you solder the wires to the new motor:
- Solder the RED wire to the Negative (-) terminal.
- Solder the BLACK wire to the Positive (+) terminal.
It feels wrong, but it’s right. This reverses the spin direction, making the generic motor compatible with your Neato.
The Surgery: Step-by-Step
Tools Needed:
- Torx T10 Screwdriver (The long, thin kind—standard fat bit holders won't fit).
- Phillips #1 Screwdriver.
- Two small flathead screwdrivers (for prying).
- Soldering iron (if replacing the motor).
- A can of compressed air.
Step 1: Open the Beast
Flip the robot over.
- Remove the battery doors and batteries.
- Remove the 8 screws holding the bottom shell.
- Tip: Don't forget the two “hidden” screws located deep in the holes next to the drive wheels.
- Carefully flip the robot back onto its wheels.
- Lift the top shell slowly from the back.
- Warning: There is a fragile ribbon cable connecting the LCD screen to the motherboard. Do not yank the top off! Unplug this cable gently.
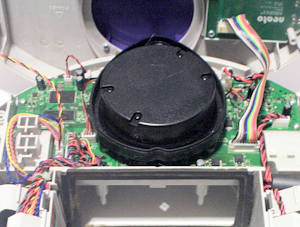
Step 2: Extract the Lidar
The Lidar unit is the large black cylinder in the center.
- Unscrew the 4 screws securing the black Lidar cover/unit to the chassis.
- Unplug the colorful wire harness from the motherboard.
- Lift the whole unit out and place it on your clean workbench.
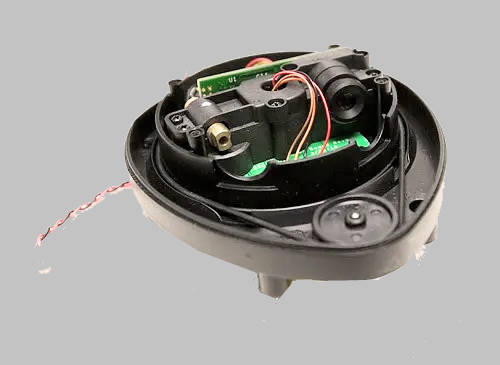
Step 3: Remove the Turret Cover
There are 4 very small Phillips screws on the Lidar unit itself. Remove the black plastic cap. You will now see the naked laser eyes (the “eyes” look like two metal cylinders) and the belt.
Pro-Tip: While you are here, take a Q-tip dipped in isopropyl alcohol and gently clean the glass lenses of the laser eyes. 10 years of dust can make the robot “shortsighted.”
Step 4: Swap the Parts
If changing the Belt: Simply lift the old belt off and stretch the new one over the motor pulley and the large turret gear.
If changing the Motor:
- Unscrew the motor mounting plate (2 screws).
- The Pulley Fight: The plastic pulley is press-fitted onto the old motor shaft. It will be tight. Use two small flathead screwdrivers (one on each side) to gently pry it up and off. Do not crush it!
- Desolder the wires from the old motor.
- Solder wires to the new motor (Reverse Polarity! Red to – / Black to +).
- Press the pulley onto the new motor shaft.
- Screw the new motor back in.
Step 5: Reassembly
Put everything back in reverse order.
- Make sure the Lidar wire harness is tucked away so it doesn't rub against the belt.
- Ensure the LCD ribbon cable is seated firmly before closing the shell.
The Moment of Truth
Place the Neato on the floor and press Start. Listen closely. You should hear a faint, consistent whirrrrr as the Lidar spins up.
- If it works: The robot will scan the room and take off. Congratulations, you just saved $500.
- If it spins but still errors: Double-check your solder joints and ensure the belt isn't slipping.
- If it spins BACKWARD: You forgot to reverse the polarity! Go back to Step 4.
Do you need help to fix the Neato Error 3000?
If you have questions about replacing the Lidar motor and belt to fix Neato Error 3000, please let us know in the comment box below.