You’ve replaced the battery, but it still dies early. You replaced the Lidar motor, but it still spins in circles. At this point, most people just start throwing parts at the robot, hoping something sticks.
Stop. Your Neato XV isn't just a vacuum; it’s a computer on wheels. And like any computer, it has a diagnostic port.
By connecting your robot to a PC, you can stop guessing and start seeing exactly what the robot sees. Whether you are using the classic NeatoControl software or the newer Neato Toolio, this guide will show you how to perform a full Neato diagnostic check via USB.
Table of contents
The Prerequisites: The Driver Nightmare
Before you can see the matrix, you need to get past the gatekeeper.
The Neato XV communicates over a virtual COM port. Unfortunately, the official Neato USB driver for Windows 10/11 is ancient and unsigned, meaning modern Windows hates it.
How to Install the Driver:
- Download the Neato XV USB driver.
- The Trick: You may need to choose “Disable Driver Signature Enforcement. (Google this if you get an installation error).
- Connect: Plug the Mini-USB cable into the robot. You should hear the Windows “Device Connected” chime. Check Device Manager for “Neato Robotics USB Port.”
Choose Your Weapon: NeatoControl vs. Toolio
There are two main tools for this job. Both are free. Both are included in our Vault for Neato XV software.
1. NeatoControl (The Classic)
NeatoControl is the original Russian-made tool. It’s abandoned but stable. It displays sensor data in visual graphs, which is great for spotting “noisy” sensors.
- Best for: Visualizing Lidar spin consistency.
2. Neato Toolio (The Modern Choice)
Neato Toolio is a newer, open-source alternative. It’s lighter, faster, and often works better on Windows 11.
- Best for: Quick toggling of motors and reading error logs.


3 Tests You Must Run
Once connected, click “Connect” in your software. The robot will enter Test Mode (you’ll verify this because the LCD screen on the robot will blank out).
Test 1: The “Fan Load” Battery Test
Your battery might show 8.0V when sitting idle, but does it collapse under load?
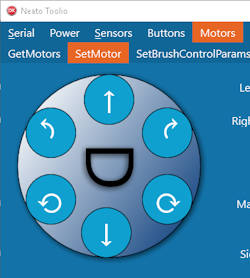
- Go to the Motors tab.
- Turn Vacuum Fan to ON (Warning: It’s loud!).
- Watch the Battery Voltage graph.
- The Diagnosis: If the voltage instantly drops below 7.2V within 10 seconds of the fan turning on, your battery cells are shot, even if they charge to 100%.
Test 2: The “Wall Sensor” Wiggle
Does your robot back up for no reason or refuse to hug walls?
- Go to the Sensors tab.
- Find the Wall Sensor value (usually measured in mm).
- Wave your hand in front of the left side of the bumper.
- The Diagnosis: The number should change smoothly from ~20mm to ~100mm. If it’s stuck at
0or jumps frantically between10and500without movement, the sensor is dirty or dead.
You may also consider upgrading the Neato XV firmware if your version is below 3.0.
Test 3: The Lidar Spin Up
This is the ultimate check for the Neato Error 3000.
- Go to the Lidar/Scanner tab.
- Click Scan.
- You should see red dots appearing in a circle (the map of your room).
- Look at the RPM value.
- The Diagnosis: A healthy robot spins at 290–310 RPM.
- 260 RPM or lower: Your belt is slipping (See this Post).
- 0 RPM: Your motor is dead or polarity is wrong.


Crucial: How to Exit Test Mode
This is the #1 mistake newbies make.
When you are done testing, you MUST click “Disconnect” in the software before unplugging the USB cable.
If you just yank the cable, the robot stays in Test Mode. The buttons won't work, and it won't clean.
- The Fix: If you forgot, just hold the Power button for 15 seconds to force a hard reboot.
Why This Matters for Scavenging
Understanding Neato diagnostics turns you into a sniper on eBay. You can buy “broken” robots that sellers claim are dead, only to plug them in, see a simple “Wheel Motor Stall” error, and fix it for free by pulling a hairball out of the axle.
Speaking of eBay… now that you are a master mechanic, let's go shopping. In our next post, we look at 3D printed upgrades to replace the fragile plastic parts Neato engineered to fail.

